ISO 12870 Eyeglass lens Retention Test Machine China Manufacturer and Supplier
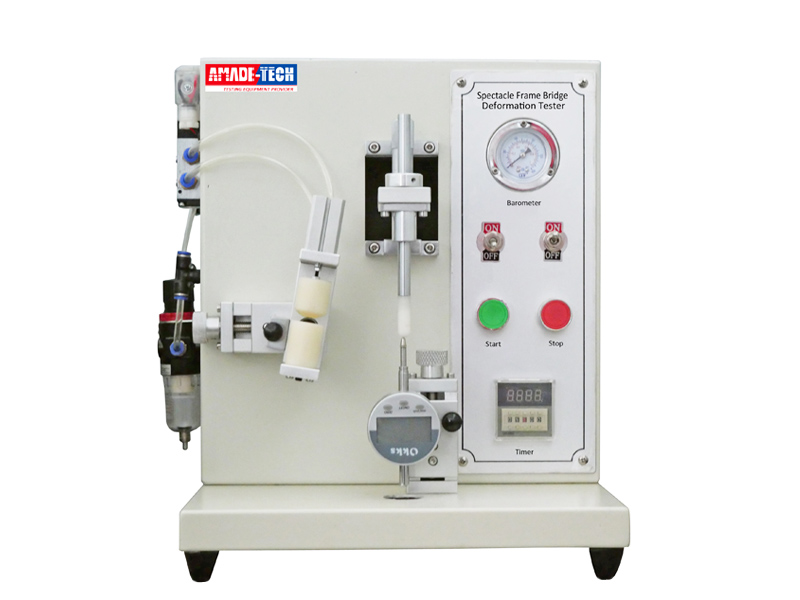
Spectacle Frame Bridge deformation tester is used to determine the ability of the spectacle frame with lenses to resist bridge deformation and the lens retention characteristics.
The test results produced by this instrument are an important basis for evaluating whether the physical properties of the glasses meet the required standards.
Description for the Frame Bridge Deformation Test Machine
Our Spectacle frame bridge deformation tester features a set of annular grips consisting of an upper jaw and a lower jaw with a diameter of 25 mm. Thanks to the two contact surfaces made of a firm elastic material, It can hold one lens without the twist or slip using a pneumatic mechanism under control. You are required to clamp the sample within 2 mm of the geometric center of one lens when mounting.
There is a pressure peg similar to a rod with a diameter of 10 mm used to act on the other lens of the sample with an almost hemispherical contact surface. It is capable of moving from 10 mm up to 8 mm down. The distance between the pressure peg and the grip can be adjusted to ensure that the pressure rod acts axially at the center of the clamping lens.
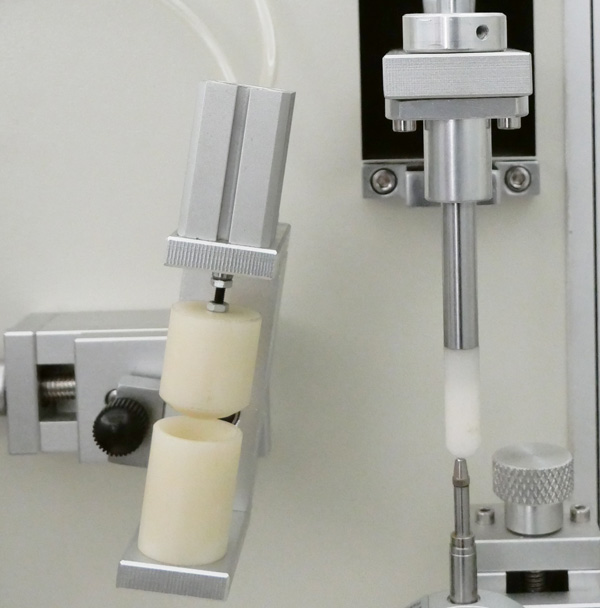
We configure a weight and special limit device to allow the downward pressure force to reach 5 N or the specified displacement to reach during the test. The apparatus is configured with a digital linear measuring gauge to display the deformation value in real time. A timer is available to record and display the pressure hold time. The pressure peg will return to its starting position automatically once the holding time is achieved.
Welcome to reach us to learn more about spectacle frame testing equipment.
| Model | AT-DR3003 |
| Clamping method | Pneumatic |
| Max. pressure | 5 N |
| Accuracy of the linear measuring device | 0.1 mm |
| Timer | Automatic |
| Dimensions | 30 mm (W) × 32 mm (D) × 33 mm (H) |
| Power supply | 220 V 50Hz / 110 V 60 Hz |
The left lens of the test piece is secured using a set of annular clamps comprising upper and lower parts. A specified load is downwards applied to the right lens slowly and smoothly through a pressure peg until a maximum force of 5 N or a required displacement is reached, then maintained for 5 seconds.
After a relaxation period of 20 s, the pressure peg is lowered again until it just rests on the lens. The deformation and percentage deformation are measured and calculated. The test piece is also inspected and examined for fracture and lens retention.
- ISO 12870
- EN 1836
Features
- Intuitive and user-friendly.
- It adopts a pneumatic method to clamp and release the sample.
- Equipped with a digital displacement measuring gauge.
- A digital timer is available.
- The pressure rod can automatically return to its original position after the holding time is reached.
Request a Quote Now
Please feel free to contact us for more details on the product, price, lead time, payment terms, shipment methods, etc. Amade Tech sales engineers will respond within one working day.


